In This Article
Your robot vacuum just stopped mid-clean again, leaving half your living room covered in yesterday’s crumbs. Sound familiar? You’re not alone—thousands of robot vacuum owners face this frustration daily because they skip one critical thing: proper maintenance.
Think about it like this: your robot vacuum maintenance tips routine is like dental hygiene for your teeth. Skip brushing for a few days, and you’ll pay the price. The same principle applies to your robotic helper, except the consequences include weakened suction, dead batteries, and a $400 device sitting in your closet collecting dust instead of removing it.
I learned this lesson the hard way when my first robot vacuum died after just 18 months. The warranty had expired, repair costs exceeded half the original price, and I felt like I’d flushed money down the drain. That’s when I discovered something remarkable: with proper care, these machines can last 4-6 years or even longer. The difference? A simple 10-minute weekly routine.
In this comprehensive guide, you’ll discover exactly how to clean robot vacuum components, troubleshoot common robot vacuum not working fixes, and implement a filter replacement schedule that keeps your device performing like new. Whether you’re dealing with brush roll cleaning challenges or need sensor calibration guidance, I’ve got you covered with actionable advice that actually works.
Quick Comparison Table
| Maintenance Task | Frequency | Time Required | Impact on Performance |
|---|---|---|---|
| Empty Dustbin | After Every Use | 1-2 minutes | Critical ⭐⭐⭐⭐⭐ |
| Clean Filter | Weekly | 3-5 minutes | High ⭐⭐⭐⭐ |
| Brush Roll Cleaning | Weekly | 5-7 minutes | High ⭐⭐⭐⭐ |
| Sensor Calibration | Monthly | 2-3 minutes | Medium ⭐⭐⭐ |
| Deep Clean | Every 3 Months | 25-30 minutes | Critical ⭐⭐⭐⭐⭐ |
| Battery Care | Ongoing | N/A | High ⭐⭐⭐⭐ |
| Software Updates | As Available | 5-10 minutes | Medium ⭐⭐⭐ |
💬 Just one click – help others make better buying decisions too! 😊
Top 7 Robot Vacuums: Expert Analysis for 2026
1. eufy Robot Vacuum 11S MAX – Best Budget Pick
The eufy 11S MAX proves you don’t need to spend a fortune for reliable cleaning performance. This ultra-slim model slides under furniture with ease thanks to its 2.85-inch profile, operating quieter than most competitors at microwave-level noise.
Key Specifications:
- 2000Pa suction power
- 100-minute runtime
- BoostIQ technology for auto-adjustment
Price Range: $150-$200
Users consistently praise its value proposition and quiet operation. One customer mentioned running it nightly without disturbing anyone’s sleep. The main trade-off? No Wi-Fi connectivity—you’ll control everything via the included remote.
✅ Pros:
- Exceptional value for money
- Ultra-quiet operation
- Slim design reaches tight spaces
❌ Cons:
- No app or Wi-Fi support
- Manual scheduling only
Maintenance Note: The simple design means fewer components to maintain, making it ideal for first-time robot vacuum owners.
2. eufy X10 Pro Omni – Premium All-in-One Solution
For those wanting the complete hands-free experience, the eufy X10 Pro Omni delivers with its all-in-one station that handles vacuuming, mopping, self-cleaning, and self-emptying. This is robot vacuum maintenance at its finest—the machine practically maintains itself.
Key Specifications:
- 8,000Pa powerful suction
- Dual mops with 12mm auto-lift
- AI obstacle avoidance
- 3L clean water tank
Price Range: $700-$900
The MopMaster 2.0 technology genuinely transforms floor care. Customers report spotless floors with minimal intervention, and the 2-month dust bag capacity means you’ll forget about emptying duties. The 45°C heated air drying prevents mold on mop pads—a thoughtful touch often overlooked by competitors.
✅ Pros:
- Comprehensive automation
- Excellent carpet detection
- Superior mopping performance
❌ Cons:
- Higher price point
- Requires regular cleaning solution refills
3. eufy C10 Robot Vacuum Self Emptying – Mid-Range Champion
The eufy C10 strikes an excellent balance between features and affordability. Its 4,000Pa suction handles pet hair effortlessly, while the unique CornerRover extendable arm ensures corners don’t become dust repositories.
Key Specifications:
- LiDAR navigation
- 60-day self-empty capacity
- 2.85-inch slim profile
- Pro-Detangle Comb
Price Range: $350-$450
The Pro-Detangle Comb significantly reduces hair wrap on brushes—a game-changer if you have pets or long hair in your household. Customer feedback highlights the 8-week hands-free cleaning as a major convenience boost, though some mention the 72dB emptying noise might startle light sleepers.
✅ Pros:
- Extended hands-free operation
- Effective corner cleaning
- Reduces hair tangles
❌ Cons:
- Loud during self-emptying
- Best suited away from bedrooms
4. Roborock Q7 L5 – Best for Versatility
The Roborock Q7 L5 combines powerful 8,000Pa suction with impressive mopping capabilities, making it perfect for homes with mixed flooring. Its dual anti-tangle system and multi-level mapping support larger homes with multiple floors.
Key Specifications:
- 8,000Pa suction
- LiDAR navigation
- Dual anti-tangle brushes
- Vacuum and mop combo
Price Range: $400-$550
Users appreciate the precise room mapping and customizable cleaning zones. The ability to save multiple floor maps eliminates the need to remap when moving between levels. Some reviewers note occasional issues with dark-colored rugs confusing cliff sensors, but this affects most robot vacuums to some degree.
✅ Pros:
- Exceptional suction power
- Multi-floor mapping
- Effective anti-tangle design
❌ Cons:
- May struggle with very dark surfaces
- Mop pads require manual switching
5. iRobot Roomba j9+ – Premium Pet Owner’s Choice
The iRobot Roomba j9+ stands out with its P.O.O.P. (Pet Owner Official Promise) guarantee—if it fails to avoid pet waste, iRobot replaces it free. This level of confidence speaks volumes about their obstacle avoidance technology.
Key Specifications:
- 100% stronger suction than i-series
- 60-day auto-empty capacity
- Advanced object recognition
- Smart mapping 7x faster
Price Range: $800-$1,000
Pet owners rave about the dual rubber brushes that handle fur without tangling. The Dirt Detective feature learns which rooms get dirtiest and adjusts cleaning accordingly—truly smart automation. Battery life easily covers 2,000+ square foot homes in one charge.
✅ Pros:
- Superior pet waste avoidance
- Excellent for pet hair
- Rapid mapping capabilities
❌ Cons:
- Premium pricing
- Subscription features optional
Maintenance Bonus: The dual rubber brushes are significantly easier to clean than traditional bristle brushes.
6. iRobot Roomba Combo i5+ – Best Value 2-in-1
The Roomba Combo i5+ offers vacuum and mop functionality at a more accessible price point than premium models. Simply swap the bin to transform between modes, giving you flexibility without buying separate devices.
Key Specifications:
- 4-stage cleaning system
- 60-day self-empty
- Smart mapping
- Dual multi-surface brushes
Price Range: $450-$600
The 60-day auto-empty capacity matches pricier models, delivering excellent value. Users particularly appreciate the Dirt Detect technology that focuses on heavily soiled areas. The main limitation? You’ll manually switch between vacuum and mop modes, but the process takes under 30 seconds.
✅ Pros:
- Dual functionality
- Competitive pricing
- Reliable Imprint mapping
❌ Cons:
- Manual mode switching
- Mopping less advanced than dedicated models
7. AIRROBO T20+ – Budget Self-Empty Option
For those wanting self-empty convenience without premium pricing, the AIRROBO T20+ delivers exceptional value. Its 3.5L dust bag and 180-minute runtime handle large homes efficiently.
Key Specifications:
- USLAM Air 5.0 navigation
- 60-day self-empty capacity
- 3-in-1 sweep, vacuum, mop
- 3200mAh battery
Price Range: $250-$350
The floating main brush adapts to different floor heights, maintaining contact for consistent cleaning. Customer reviews highlight the smartphone app’s user-friendliness and multiple control options. Operating noise stays below 65dB during cleaning—impressively quiet for this price range.
✅ Pros:
- Affordable self-empty system
- Extended battery life
- Multiple control methods
❌ Cons:
- Only 2.4GHz Wi-Fi support
- Basic obstacle avoidance
Why Robot Vacuum Maintenance Tips Matter More Than You Think
Here’s something most people don’t realize: neglecting basic maintenance can cut your robot vacuum’s lifespan in half. According to research from the Consumer Electronics Association, properly maintained robot vacuums last an average of 4-6 years, while neglected units often fail within 2-3 years.
The math is simple but striking. A $500 robot vacuum maintained properly costs you about $100 per year over five years. That same device neglected might cost $250 annually over just two years before replacement—plus the hassle of shopping for and setting up a new unit.
Performance Degradation Happens Gradually
Most owners don’t notice their vacuum’s declining performance because it happens incrementally. Suction drops by 5% here, battery life decreases by 10 minutes there. Before you know it, your once-powerful cleaning companion struggles with basic tasks.
Weekly filter cleaning alone can maintain 90-95% of original suction power versus 60-70% for uncleaned filters. That’s the difference between a thorough clean and just pushing dust around your floors.
Common Maintenance Failures Cost Real Money
- Clogged filters: Reduces suction by 30-40% and strains motors
- Tangled brushes: Increases power consumption and wear
- Dirty sensors: Causes navigation errors and missed spots
- Neglected batteries: Permanent capacity loss after deep discharge cycles
- Dustbin overflow: Spreads debris instead of collecting it
Each of these issues alone might seem minor, but combined they create a cascade of problems that eventually render your robot vacuum ineffective. The good news? Preventing them takes just minutes weekly.
How to Clean Robot Vacuum Components: Step-by-Step Guide
Let me walk you through the essential cleaning tasks that keep your robot running smoothly. I’ve organized these by frequency to help you establish a sustainable routine.
Daily Tasks (2 Minutes)
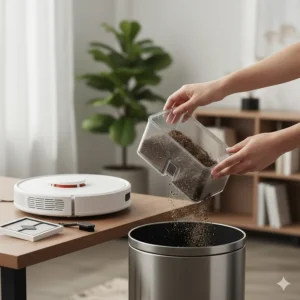
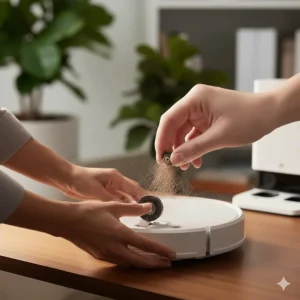
Empty the Dustbin
This might seem obvious, but it’s the single most impactful maintenance task. Here’s why: a full dustbin doesn’t just reduce capacity—it blocks airflow, weakens suction, and forces debris back onto your floors.
Quick Process:
- Remove dustbin from robot (most click or slide out)
- Open over trash can and tap sides to loosen debris
- Wipe interior with dry cloth if needed
- Reinsert until you hear the click
Pro tip: If you have pets or run your vacuum daily, empty after every cleaning cycle. For lighter use, every other day works fine.
Weekly Tasks (10-15 Minutes Total)
Filter Replacement Schedule and Cleaning
Filters trap microscopic particles but clog quickly. Most manufacturers recommend weekly cleaning and replacement every 2-3 months, though heavy use may require more frequent changes.
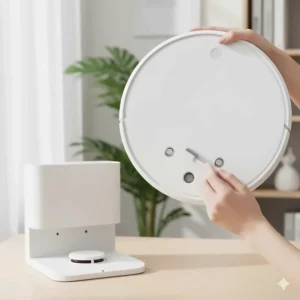
Cleaning Washable Filters:
- Remove filter from dustbin compartment
- Tap over trash can to remove loose dust
- Rinse under lukewarm water (ONLY if labeled washable)
- Air dry completely (24 hours minimum) before reinstalling
- Never use hot water or detergents
For Non-Washable Filters:
- Tap firmly against trash can edge
- Use compressed air to blow out embedded particles
- Replace immediately if damaged or excessively dirty
⚠️ Critical Warning: Installing a damp filter can damage your vacuum’s motor. Always ensure complete drying.
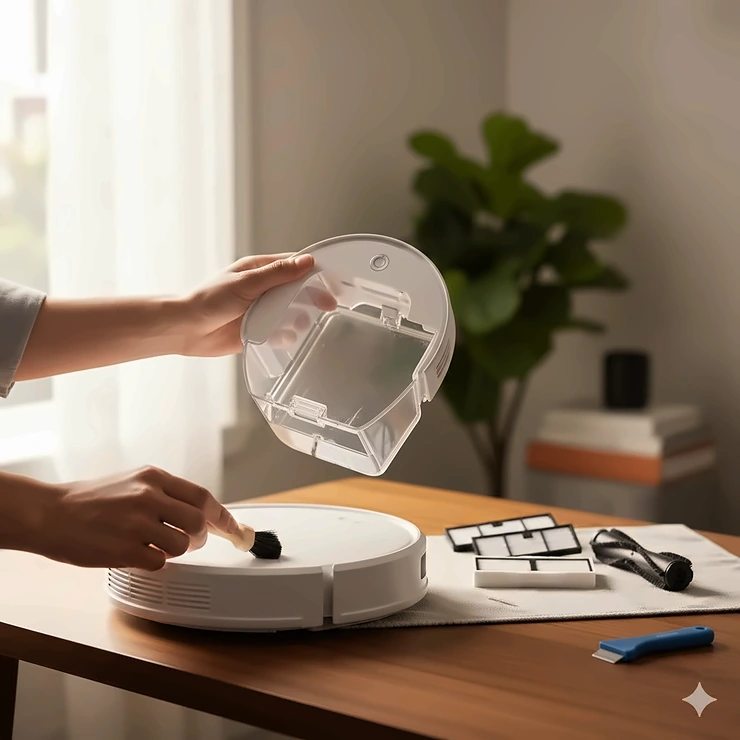
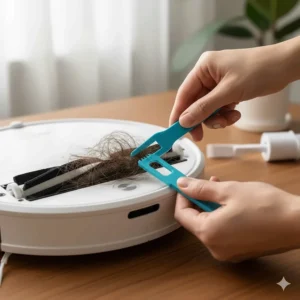
Brush Roll Cleaning: The Most Neglected Task
Hair, string, and fibers wrap around brush rolls like nobody’s business. Left unchecked, this creates resistance that strains motors and reduces cleaning effectiveness.
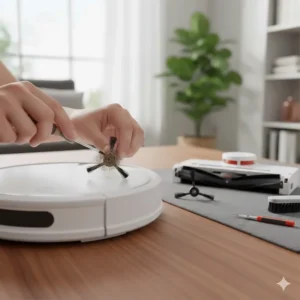
Detailed Cleaning Steps:
- Flip vacuum upside down and locate brush roll compartment
- Press release tabs and remove brush assembly
- Use scissors or the included cleaning tool to cut away wrapped hair
- Pull debris from both ends of the roller
- Wipe roller with slightly damp cloth
- Check end caps for hair accumulation
- Reinstall firmly until locked in place
Time-Saving Hack: Some newer models feature anti-tangle designs with rubber flaps or V-shaped brushes. The eufy X10 Pro Omni and Roborock Q7 L5 excel here, requiring brush cleaning only every 2-3 weeks instead of weekly.
Side Brush Maintenance
Side brushes sweep debris from edges and corners into the main cleaning path. They’re simple to maintain but often forgotten.
- Unscrew or pop off side brushes (depends on model)
- Remove wrapped hair and debris
- Wipe clean with damp cloth
- Check bristles for damage or excessive wear
- Replace if bristles are significantly shorter than when new
Replacement Frequency: Every 6-12 months depending on usage and floor types. Carpets wear brushes faster than hard floors.

Monthly Maintenance (20-30 Minutes)
Sensor Calibration and Cleaning
Your robot vacuum relies on multiple sensors for navigation, cliff detection, and obstacle avoidance. Dust accumulation degrades sensor accuracy, leading to erratic behavior.
Sensor Types and Locations:
- Cliff sensors (underneath): Prevent falls down stairs
- Bumper sensors (front): Detect obstacles
- Wall sensors (sides): Maintain proper distance from walls
- Camera/LiDAR (top): Map your home
Cleaning Process:
- Power off vacuum completely
- Locate all sensors using your manual’s diagram
- Gently wipe each sensor with microfiber cloth
- For stubborn grime, slightly dampen cloth with water
- Dry immediately with clean cloth
- Restart vacuum and run test cleaning cycle
Sensor Calibration Steps: Most modern robots auto-calibrate, but some require manual intervention:
- Place vacuum on flat, level surface
- Access calibration in mobile app settings
- Follow on-screen prompts (usually involves rotating or moving vacuum)
- Confirm calibration success
Troubleshooting Sensor Issues:
- Vacuum repeatedly bumps walls: Clean bumper sensors
- Falls down stairs: Clean cliff sensors immediately
- Poor navigation: Clean camera or LiDAR sensor
- Ignores obstacles: Check wall and object sensors
Wheel and Axle Inspection
Wheels accumulate hair, carpet fibers, and debris that impede smooth movement.
- Flip vacuum and examine wheels for wrapped material
- Pop out removable wheels (if applicable)
- Cut away wrapped hair carefully
- Wipe wheel axles with dry cloth
- Spin wheels to ensure smooth rotation
- Apply tiny drop of machine oil to axle if squeaking (check manual first)
Quarterly Deep Clean (45-60 Minutes)
Every three months, perform a comprehensive cleaning that covers everything:
Complete Disassembly Clean
- Remove all removable parts: dustbin, filters, brushes, wheels, side brushes
- Wash washable components with mild soap and warm water
- Dry everything completely (24-48 hours for best results)
- Wipe down exterior with damp microfiber cloth
- Clean charging contacts on both vacuum and dock with dry cloth or alcohol wipe
- Inspect for damage: cracks, loose parts, excessive wear
- Update software if available
- Reassemble carefully ensuring everything clicks securely
Extend Robot Vacuum Lifespan: Battery Care Essentials
Battery health determines how long your vacuum runs per charge and, ultimately, how long before replacement becomes necessary. Lithium-ion batteries in robot vacuums typically last 2-4 years with proper care.
Battery Best Practices
Charging Habits That Matter
DO:
- Keep vacuum docked between cleaning cycles
- Maintain charge between 20-80% when possible
- Use manufacturer-approved charging dock only
- Clean charging contacts monthly
DON’T:
- Let battery fully discharge repeatedly
- Store with dead battery for extended periods
- Use third-party chargers (fire hazard risk)
- Charge in extreme temperatures (below 32°F or above 104°F)
Off-Peak Charging Feature
Premium models like the eufy X10 Pro Omni include off-peak charging that optimizes charge cycles to reduce long-term battery wear. Enable this feature in your app settings if available.
Storage for Extended Non-Use
Planning a vacation or storing your vacuum seasonally? Follow these steps:
- Charge battery to 40-50%
- Power off completely
- Remove from charging dock
- Store in cool, dry location (60-75°F ideal)
- Charge to 50% every 2-3 months during storage
Why 40-50%? Storing lithium batteries at full charge or empty accelerates degradation. The 40-50% sweet spot minimizes stress on battery cells.
Robot Vacuum Not Working Fixes: Troubleshooting Common Issues
Even well-maintained vacuums encounter occasional hiccups. Here’s how to diagnose and fix the most common problems.
Vacuum Won’t Turn On
Possible Causes:
- Dead battery
- Power button stuck
- Charging dock malfunction
Solutions:
- Place on dock for 3+ hours
- Check dock power connection
- Clean charging contacts with dry cloth
- Try different outlet
- Perform hard reset (hold power button 10-15 seconds)
If still unresponsive after 6 hours charging, battery replacement may be needed.
Reduced Suction Power
Nothing’s more frustrating than a vacuum that leaves debris behind. Suction loss has multiple potential causes.
Systematic Troubleshooting:
- Check dustbin: Empty if more than 2/3 full
- Inspect filter: Clean or replace if clogged
- Examine main brush: Remove tangles and debris
- Check suction inlet: Clear any blockages
- Inspect hose/airways: Remove clogs with long tool
- Verify seal integrity: Ensure dustbin seats properly
Pro Tip: 80% of suction issues stem from clogged filters or full dustbins. Always start with the simplest solutions.
Navigation and Mapping Problems
Modern robot vacuums create maps of your home for efficient cleaning. When mapping fails, cleaning becomes chaotic.
Symptoms:
- Random instead of systematic patterns
- Missing entire rooms
- Repeatedly cleaning same area
- Getting lost and unable to dock
Fixes:
- Delete existing maps and remap (app settings)
- Improve lighting (cameras need adequate light)
- Remove obstacles from floor
- Clean all sensors thoroughly
- Check for Wi-Fi interference
- Restart router and vacuum
- Update firmware to latest version
Mapping Optimization:
- Run initial mapping during daytime
- Close doors to unused rooms initially
- Remove small rugs that bunch up
- Ensure docking station has 3 feet clearance
Vacuum Keeps Stopping Mid-Clean
This frustrating issue usually indicates power, navigation, or mechanical problems.
Common Causes and Solutions:
Low Battery:
- Ensure starting with full charge
- Check battery health in app
- Reduce cleaning area or frequency
- Consider battery replacement if >2 years old
Wheel Obstruction:
- Inspect wheels for trapped debris
- Clean wheel axles
- Ensure wheels spin freely
Sensor Malfunction:
- Clean all sensors (especially cliff sensors)
- Recalibrate sensors via app
- Check for sensor error codes
Software Glitch:
- Perform factory reset
- Update to latest firmware
- Reinstall mobile app
Connectivity and App Issues
Smart features depend on reliable Wi-Fi connections. When that fails, you lose scheduling, mapping, and remote control.
Troubleshooting Steps:
- Verify Wi-Fi compatibility: Most require 2.4GHz (not 5GHz)
- Move closer to router during pairing
- Restart router and vacuum
- Update app to latest version
- Delete and re-add vacuum in app
- Check router settings: Ensure MAC filtering isn’t blocking device
- Disable VPN during setup
Network Requirements:
- 2.4GHz Wi-Fi network
- WPA2 security (most secure compatible)
- Strong signal strength where vacuum operates
- Router firmware updated
Strange Noises During Operation
Unusual sounds often signal mechanical issues requiring immediate attention.
Sound Diagnosis:
Grinding/Scraping:
- Foreign object in brush compartment
- Damaged brush bearings
- Worn drive belt
High-Pitched Squealing:
- Wheels need cleaning or lubrication
- Motor bearing wear
- Side brush hitting object
Rattling:
- Loose internal component
- Debris in wheel housing
- Damaged fan blade
Solution: Power off immediately, inspect thoroughly, and remove any foreign objects. If noise persists after cleaning, contact manufacturer support—continuing use may cause additional damage.
Creating Your Personalized Maintenance Schedule
One-size-fits-all maintenance doesn’t work because household needs vary dramatically. A pet-free apartment needs different care than a home with three shedding dogs.
Factors Affecting Maintenance Frequency
High Maintenance Scenarios (Daily/Every Other Day):
- Multiple pets with heavy shedding
- Large households (4+ people)
- Homes with long-haired occupants
- Daily vacuum operation
- Primarily carpeted floors
- High pollen/allergen environments
Moderate Maintenance (2-3 Times Weekly):
- 1-2 pets with moderate shedding
- Smaller households (2-3 people)
- Mix of carpet and hard floors
- 3-4 cleaning cycles per week
Light Maintenance (Weekly):
- No pets
- Single occupant or couple
- Primarily hard floors
- 1-2 cleaning cycles per week
- Minimal foot traffic
Sample Maintenance Calendars
For Pet Owners
| Task | Frequency |
|---|---|
| Empty dustbin | After every use |
| Clean filter | Every 3-4 days |
| Brush roll cleaning | Twice weekly |
| Side brush cleaning | Weekly |
| Sensor cleaning | Bi-weekly |
| Deep clean | Monthly |
| Filter replacement | Every 4-6 weeks |
For Light Use Households
| Task | Frequency |
|---|---|
| Empty dustbin | Every 2-3 uses |
| Clean filter | Weekly |
| Brush roll cleaning | Weekly |
| Side brush cleaning | Bi-weekly |
| Sensor cleaning | Monthly |
| Deep clean | Quarterly |
| Filter replacement | Every 3 months |
Advanced Maintenance Tips: Beyond the Basics
Once you’ve mastered routine maintenance, these advanced techniques further optimize performance and longevity.
Docking Station Care
The charging dock requires maintenance too. Dirty contacts prevent proper charging and can damage battery long-term.
Monthly Dock Maintenance:
- Unplug dock from power
- Wipe charging contacts with dry cloth
- Clean with alcohol wipe for stubborn residue
- Vacuum around dock to prevent dust accumulation
- Ensure dock sits level and stable
- Verify adequate clearance (3 feet recommended)
Mopping System Maintenance
For combo vacuum-mop models, mop pads and water systems need special attention.
After Each Mopping Session:
- Remove mop pads
- Rinse thoroughly under warm water
- Wring out excess moisture
- Air dry completely before storage
- Never leave wet pads attached to vacuum
Weekly:
- Deep clean pads with mild detergent
- Inspect for wear and fraying
- Clean water tank and refill port
- Check for mineral buildup (use vinegar solution if needed)
Monthly:
- Replace mop pads (or according to manufacturer schedule)
- Descale water system if using tap water
- Lubricate moving mop components if specified
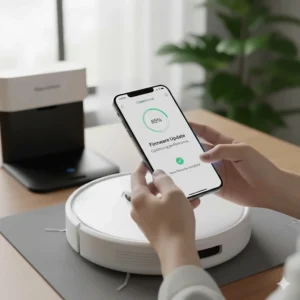
Firmware and Software Updates
Manufacturers regularly release updates improving performance, navigation, and fixing bugs. Enable automatic updates in your app, or check monthly for new versions.
Update Best Practices:
- Start with full battery (>50%)
- Ensure stable Wi-Fi connection
- Don’t interrupt update process
- Test cleaning cycle after update
- Report any new issues to manufacturer support
Seasonal Preparation
Different seasons bring unique cleaning challenges requiring maintenance adjustments.
Spring (Pollen Season):
- Increase filter cleaning to twice weekly
- Consider HEPA filter upgrade
- Run vacuum daily during peak pollen
- Clean sensors more frequently
Fall (Leaf Season):
- Check wheels for tracked-in debris daily
- Clear larger particles before vacuum runs
- Inspect brushes for small twigs or leaf pieces
Winter (Dry Air):
- Combat static buildup with anti-static spray on exterior
- Increase humidity indoors to reduce static
- Clean more frequently due to tracked salt/sand
Summer (Pet Shedding):
- Daily brush roll inspection
- Consider upgrading to anti-tangle brush
- Empty dustbin more frequently
Smart Home Integration and Automation
Modern robot vacuums integrate with smart home ecosystems, enabling powerful automation that reduces manual maintenance reminders.
Voice Assistant Commands
Configure voice commands for maintenance tasks:
- “Alexa, start robot vacuum cleaning cycle”
- “Hey Google, send vacuum to dock”
- “Siri, check robot vacuum battery status”
IFTTT and Automation Ideas
Automated Maintenance Reminders:
- Weekly filter cleaning reminder
- Monthly deep clean notification
- Filter replacement countdown
Smart Cleaning Schedules:
- Run vacuum when you leave home (geofencing)
- Clean high-traffic areas before guests arrive
- Adjust frequency based on pollen count (via weather app)
Integration Examples:
- Automatically start when smart thermostat detects you’ve left
- Pause cleaning when doorbell rings
- Send completion notification to phone
- Monitor battery health and alert when degrading
When to Replace vs. Repair
Even with excellent maintenance, components eventually wear out. Knowing when to replace versus repair saves money and frustration.
Components to Replace Regularly
Filters: Every 2-4 months (washable last longer)
Brushes:
- Main roller: 6-12 months
- Side brushes: 6-9 months
- Indicators: Worn bristles, reduced cleaning effectiveness
Batteries: 2-4 years
- Signs: Runtime drops below 50% of original, won’t hold charge
Wheels: 2-3 years
- Signs: Cracks, inability to rotate smoothly, excessive wear
Repair vs. Replace Decision Matrix
| Issue | Repair Cost | Replace If: |
|---|---|---|
| Battery replacement | $50-$100 | Vacuum >4 years old, multiple other issues |
| Main motor failure | $100-$200 | Vacuum >3 years old, out of warranty |
| Navigation system | $75-$150 | Newer models offer better features at similar cost |
| Broken wheels | $20-$40 | Always repair (simple, cheap) |
| Cracked chassis | $50-$100 | Repair if under 2 years old |
Rule of Thumb: If repair costs exceed 50% of replacement cost for a similar new model, replacement makes more financial sense.
✨ Don’t Miss These Exclusive Deals!
🔍 Take your robot vacuum maintenance to the next level with these carefully selected products. Click on any highlighted item to check current pricing and availability. These tools will help you create authentic cleaning results your family will love!
Common Mistakes That Shorten Robot Vacuum Lifespan
Learning what NOT to do is equally important as proper maintenance techniques. Here are mistakes I see repeatedly:
Mistake #1: Using Wet Filters
Installing damp filters tops the list of damaging behaviors. Moisture inside the vacuum motor compartment creates corrosion and short circuits. Always ensure 24-48 hours drying time for washable filters.
Mistake #2: Ignoring Error Messages
That beeping or flashing light isn’t just annoying—it’s your vacuum crying for help. Check your app or manual immediately when errors occur. Continuing operation during errors causes exponential damage.
Mistake #3: Overloading Cleaning Schedules
Running your vacuum 3-4 times daily accelerates wear dramatically. Most homes need once daily maximum. More frequent cleaning should trigger reassessing your floor care routine, not punishing your robot.
Mistake #4: Using Harsh Chemicals
Bleach, ammonia-based cleaners, and abrasive chemicals damage plastic components and rubber seals. Stick to mild soap and water for cleaning, and manufacturer-approved cleaning solutions for mopping functions.
Mistake #5: Forgetting Software Updates
Outdated firmware causes performance issues and prevents bug fixes. Enable automatic updates or check monthly manually.
Mistake #6: Poor Docking Station Placement
Tucking the dock in a corner or against walls prevents proper return-to-dock functionality. Ensure 3 feet of clearance on all sides for optimal navigation.
Environmental Impact and Sustainability
Proper maintenance doesn’t just save money—it reduces electronic waste and environmental impact.
Extending Lifespan Reduces E-Waste
The average robot vacuum weighs 5-8 pounds and contains batteries, circuit boards, motors, and plastic components. Premature disposal means these materials enter landfills rather than continuing useful service.
By extending your vacuum’s life from 3 to 6 years through proper maintenance, you directly reduce e-waste by 50%. Multiply that by millions of robot vacuum users, and the environmental impact becomes substantial.
Sustainable Maintenance Practices
Choose Reusable Over Disposable:
- Washable filters instead of disposable
- Rechargeable battery packs
- Durable mop pads that last months
Eco-Friendly Cleaning:
- Plain water for most cleaning tasks
- Vinegar for descaling (natural, biodegradable)
- Microfiber cloths (washable, long-lasting)
Proper Disposal:
- Recycle batteries at designated facilities
- Return old filters to manufacturer recycling programs
- Donate functional vacuum when upgrading
FAQs: Robot Vacuum Maintenance Tips
❓ How often should I replace robot vacuum filters?
❓ What causes my robot vacuum to stop working suddenly?
❓ Can I wash robot vacuum filters with soap?
❓ How do I extend my robot vacuum battery lifespan?
❓ What's the best way to clean robot vacuum sensors?
Conclusion: Your Path to 6+ Years of Robot Vacuum Performance
You’ve now discovered the complete framework for robot vacuum maintenance tips that actually work. From daily dustbin emptying to quarterly deep cleans, each task contributes to a machine that serves you reliably for years rather than months.
Remember my earlier story about the $400 vacuum that died after 18 months? That was a $267-per-year lesson in neglect. Compare that to my current robot vacuum—3.5 years old and still performing like new—costing me just $114 annually. The difference? A simple 10-minute weekly routine.
The beauty of robot vacuum maintenance lies in its simplicity. You don’t need technical expertise or special tools. Just consistency. Empty the dustbin after use, clean the filter weekly, detangle brushes, and wipe sensors monthly. These small habits compound into thousands of dollars saved over a decade.
Your action plan starts today:
This Week:
- Empty dustbin after every cleaning
- Clean or replace filter
- Inspect and clean brushes
- Download maintenance calendar template
This Month:
- Clean all sensors
- Inspect wheels and charging contacts
- Update firmware if available
- Order replacement filters (set recurring purchase)
This Quarter:
- Complete deep clean
- Assess battery health
- Replace worn components
- Evaluate overall performance
The robot vacuum sitting in your home right now represents a significant investment in convenience and cleanliness. Protect that investment with consistent care, and it will reward you with years of effortless floor maintenance. Your future self will thank you when your vacuum is still running strong at year five while your neighbor shops for replacement number three.
Start small, stay consistent, and watch your robot vacuum transform from a maintenance-intensive gadget into a truly set-it-and-forget-it cleaning companion. Your floors—and your wallet—will thank you.
Recommended for You
- LiDAR vs Camera Navigation Robot Vacuum: 7 Best Models 2026
- Robot Vacuum vs Traditional Vacuum: 7 Shocking Truths 2026
- 7 Best Robot Window Cleaners 2026
Disclaimer: This article contains affiliate links. If you purchase products through these links, we may earn a small commission at no additional cost to you.
✨ Found this helpful? Share it with your friends! 💬🤗